Wednesday, August 31, 2011

Crispy Chicken Roll-ups


My sorority pledge class had a dinner (Fiesta!)night tonight and each guest was supposed to bring a dish.  I immediately tried to think of something easy, QUICK, and fun.  I came across these on the Food Network website and thought they sounded perfect!  Turns out I was right (or I think anyways)!  There were only 3 left at the end of the party.  I'll think of it as a success!

First, preheat the oven to 350. Coat chicken breast tenderloins with salt and pepper.  Bake them for about 15 minutes, or until there is no pink in the center of the meat.  


Next, tear the chicken into bite size pieces.  I used a package of 10 tortillas for one package of chicken tenders and the ratio was near perfect!  Place chicken and shredded cheese in the middle of a tortilla shell, and secure each of the rolls with a toothpick.  


Finally, fill a frying pan not quite half full with vegetable oil and fry each roll for about 4 minutes on each side-until golden brown.  I cut each roll-up in half to make them more finger-food like.  Serve them with salsa and sour cream/any of your favorite mexican toppings.  


Our fiesta party turned out great!  There is nothing better than food and friends together  :)

Friday, August 26, 2011

food....finally


Hi there!  Thank you for being patient with me while I have been busy getting my life in sorts (or trying to anyways).  This semester is off to a hectic start, but I love it!  All of my classes are great.  I am really beginning to learn the principles of the dietetic profession and am even gaining some hands on kitchen experience this semester!  Today, I went to an elementary school and helped prepare school lunch.  I sliced apples, cooked spaghetti, made loaded baked potatoes, and baked cookies.  I also got treated to a free lunch  :)  It has been forever since I have eaten cafeteria food and boy has it improved since my days.  It is amazing the healthy alternatives the children in schools today are being fed.  It gives me much hope that we are headed in the right direction in keeping American's healthy!  It also gives me great satisfaction that one day I will be responsible for the health and wellness of certain communities!

Well, all of my time in the kitchen this morning inspired me to spend the afternoon in my own kitchen!  Finally!!  While I can't say I whipped up the most nutritious dish, I can say that it is certainly delicious!  I found this recipe for a red velvet cake roll last week and have been excited to make it since.  And, since it was RED velvet, I felt it was only appropriate to listen to Christmas music while I baked.  Needless to say, it was pretty much a glorious afternoon.  (in case you were wondering, it is only 120 days 'til Christmas!!!!!!!!!)
However, I am sure you would rather see/hear about the cake rather than my obsession with holidays.

This recipe is really quite simple!

I always manage to make such a mess!!

What you will need for the cake:  1 c flour, 2 Tbsp cocoa powder, 1/2 tsp baking soda, 1/8 tsp salt, 1/2 c milk, 1 tsp vanilla flavoring, 1 tsp white vinegar, 1 T red food coloring, 1 stick butter-room temperature, 3/4 c granulated sugar, 1 large egg

What you will need for the Cream Cheese White Chocolate Frosting:  1/2 stick butter-room temperature, 1 8oz. cream cheese, 5 oz. white chocolate chips-melted, 1/3 c powdered sugar

Preheat the oven to 375. Cover a jelly roll pan with aluminum foil and butter and flour the foil.  In a small bowl, combine the flour, cocoa, baking soda, and salt.  In another small bowl, combine the milk, vanilla, and vinegar.  In a large mixing bowl, beat the butter until creamy, then add sugar.  Next, add the egg and continue to beat until smooth.  Next, alternate pouring in the flour mixture and the milk mixture, while continuing to beat until all of the mixtures have been added to the mixing bowl.  Finally, add the food coloring and blend until the color is consistent.  Immediately transfer the batter to the pan and bake until top appears firm ( about 10 minutes).

I was so pleased with the color!  


Let the cake cool for a few minutes, and then transfer the cake, on the foil, to a wire cooling rack.  Create a tent over the cake with aluminum foil to secure moisture but keep it from sticking to the cake.  Let cool 45 min.

foil "tent" over the cake on the wire rack

Finally, to make the icing just create the cream cheese in a large mixing bowl.  Add the white chocolate chips    and continue to mix.  Then add the butter and sugar.  Once the consistency is smooth and creamy, the cake is ready to be frosted!

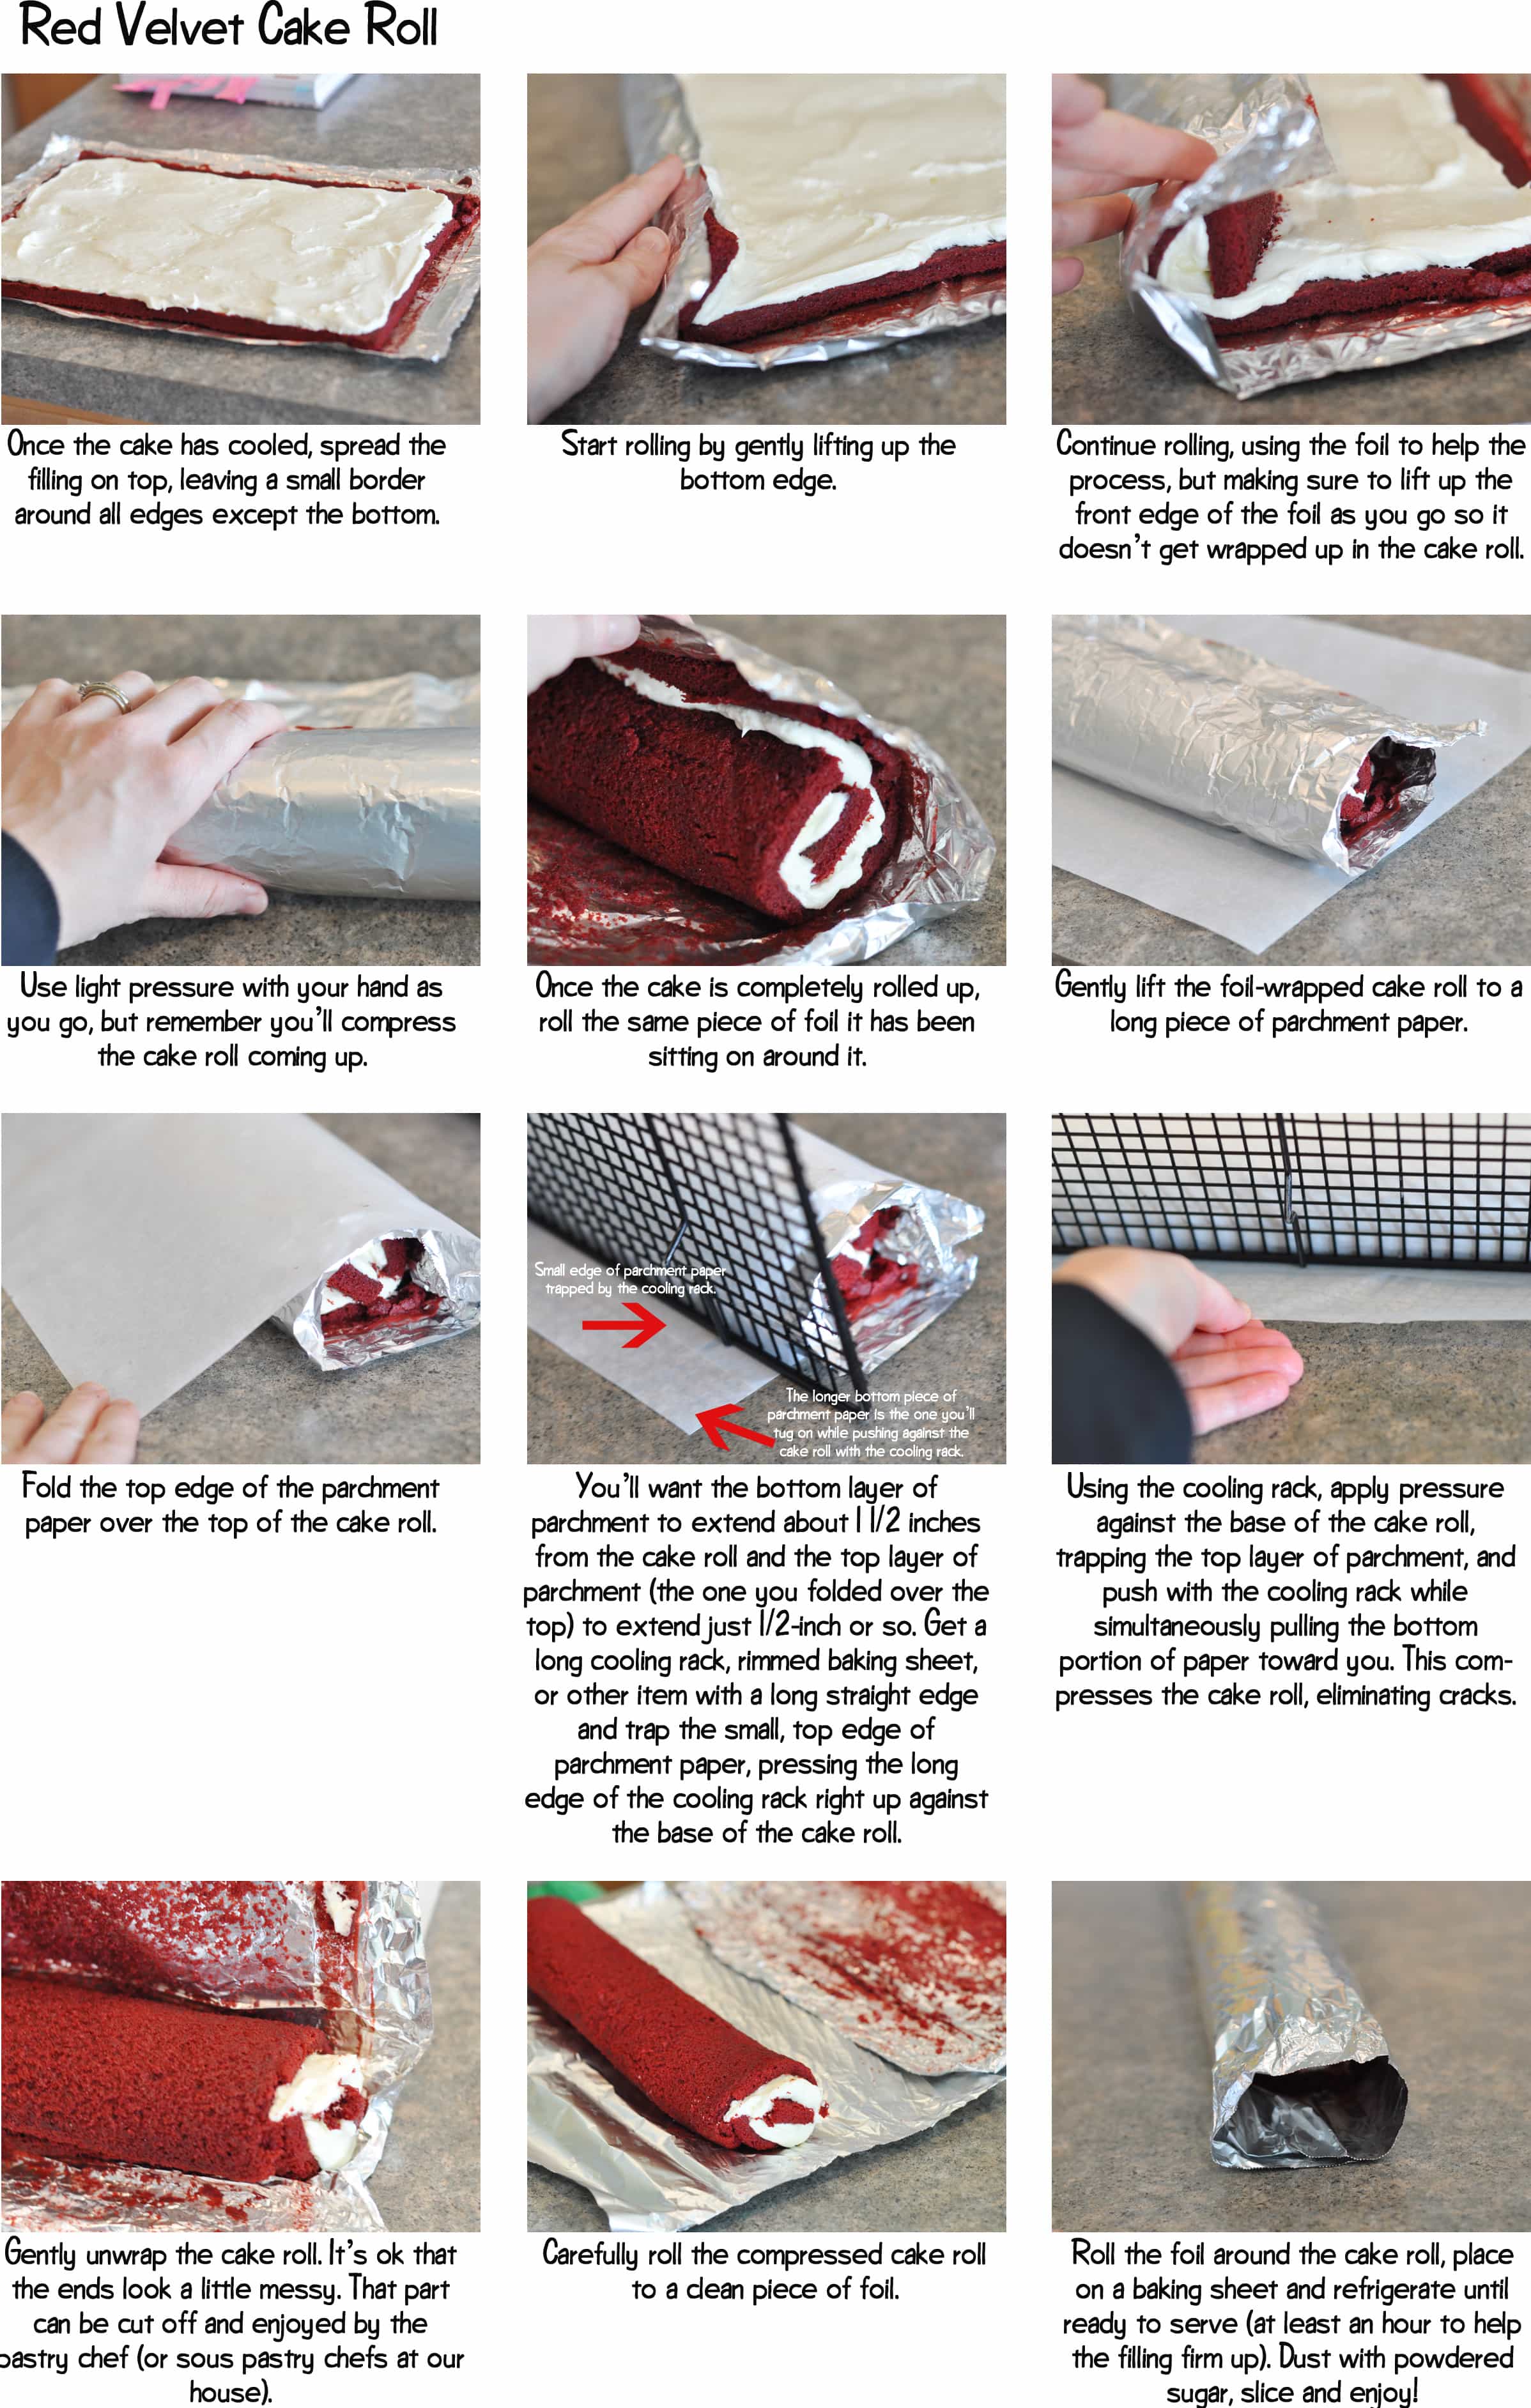
The next few steps are outlined nicely in a tutorial I found at this link:  http://www.melskitchencafe.com/wp-content/uploads/2011/05/Red-Velvet-Cake-Roll-How-To-JPG.jpg.  I think this is a much more efficient way to show you how to "roll" rather than me try to explain it to you!

just before going to the fridge

my packaging technique  ;)

my lovely assistants. they helped clean-up...the crumbs!  haha  But, I can't say that I blame them


the loaf of happiness.......but really


I hope you love this recipe as much as I do!  Red velvet is probably one of my top 3 favorite cake flavors, and this cake roll puts any red velvet cake I've ever had to shame.  It is so moist and the icing is so rich that 2 indulgent bites is all you need to get your fix of this delicious dish.  Please try and enjoy  :)

Wednesday, August 17, 2011

things occupying my time lately....

1. car washing
2. target trips
3. my last first day of school...eeeek!
4. Auburn deezee rush week
5. half marathon training
6. eric church's new jams
7. research on African mission trips
8. fall cleaning
9. cake pop eating
10. watching Wheel of Fortune on a regular basis again

just in case you were wondering  :)
my next post will include a recipe I am very excited about!  it's something i've never attempted to make before so i'm pumped!

Saturday, August 6, 2011

one family to the next

Well, I hope you enjoyed seeing the pictures of my hew home!  My family is having a major yard sale (yes! we actually cleaned out a TON of junk!!) as I type this.  Unfortunately, I am not there to help.  Instead, I am in Auburn preparing for recruitment 2011.  While it is very exciting to be back in Auburn and reunited with my roommates and friends, part of me wishes I was still at home to help with the final weekend of moving.  They will officially be moved by tonight!!  They are all so excited and Theresa keeps sending me picture messages as the rooms become complete. 

Well, I suppose lingering on the topic isn't going to do me any good.  Let's see, what have I been doing since my arrival back to Auburn?  Of course, I have made a Kroger visit.  I am on the extreme college kid budget this semester so I bought only the essentials for about a month-ish.  Granola bars for breakfast, turkey and swiss sandwiches for lunch, apples and Luna bars for snack, corn dogs for dinner, and ice cream for dessert--of course!  I realized as I was doing my shopping that I will probably not be able to buy too many extra groceries for recipe making  :(  BUT, I am not giving up cooking completely.  I love to cook and bake and feel like splurging every once in awhile will be acceptable.  And when I do, I will definitely share it with you!   

The rest of my time has been devoted to sorority life these past few days, and will be for the next 8 as well.  Recruitment definitely makes for a long week and a half, but it is all so rewarding when the new pledge class finally arrives.  We are all so excited for our new baby turtles  :)  We took some pictures last night on Samford Lawn (for those of you unfamiliar with Auburn, it is the most tradition filled place on campus, and the most beautiful!).  It was soo hot in the 100 degree heat with our white shirts and JEANS on!  I thought I might have melted completely, but of course I managed to make it out alive.  Here is a picture of my family!   


We also took some pink house roomie pictures.  Hopefully some of them turn out decent enough to decorate our house with! 

Thursday, August 4, 2011

drum roll please....

Well, I am full of more excuses!  BUT, we changed our interent service provider last week, and of course there were a few technical complications.  I had typed up this whole lengthy post, but then I realized I was unable to submit it.  However, I am submitting it now and hope you still enjoy what I have to share........I think you will!  :)
Wow has this been a happening week or what?!!?  I have a TON of things to share with you today so let me get started.

First, I finally got new tennis shoes!  I have been in dire need of some for about a month now.  As you can see....
Check out the hole in the top......

Aren't they snazzy??

My mom, dad, and sister, Ashton, went to Montgomery on Monday to do some appliance shopping for the new house, and they also managed to remember me asking for new kicks.  They did a pretty good job choosing a pair too.  I use the Nike+ shoes when I run so their choices were limited, but they settled on this pair.  I have already run in them three times and love them!  Props to the fam!

My second piece of exciting news.....I finally have a recipe for you!!  :)  I found this recipe in my grandmother's kitchen and had to try it out!  It is called The Lazy Man's Cobbler, and you will soon see why. All you need for this pie is:  1 cup sugar, 1 cup flour, 1 cup milk, 1 stick margarine, and 1 pint of fresh peaches (or the fruit of your preference).  Heat the oven to 350 and bake for 50-60 minutes.

First, melt the butter in a 9x13 glass pan in the pre-heating oven.

Stir together the sugar, flour, and milk.

Simply pour this mixture over the butter and DO NOT STIR!

Next, arrange the peaches on top, but DO NOT STIR!

And that's it.  Bake it for 50-60 minutes and you have the easiest peach cobbler ever!  I will say it is difficult to tell if it is really done or not because it has a lot of liquid that still bubbles on the top, even after 60 minutes.  But, once it cools down, it sets and forms a crust on the bottom and slightly over the top.  You have got to try this cobbler!  :)  In fact, it looked so good, that I didn't even have a chance to photograph it before there was already a good bit missing.  I guess I should have expected that from my family though haha.


And finally, here are the pictures of our house so far.  I just  realized that after I got pictures of each room inside, I forgot to take any pictures of the outside.  So check back for those  :)  Well, here is your own semi-virtual tour of a major work in progress:  

Dining room/Den. 
We decided to leave the wallpaper, but we painted the tan on the bottom half of the walls

dining room/den again

The chest and lamp my grandmother bought for the entry hall

The girls' bathroom. 
We painted it blue, replaced the sinks, all of the hardware, and the light fixture

vanity in the girls' bathroom

Ashton's bedroom.
She chose the color to coordinate with her new bedding
It is going to look really good!

Maire's sweet room!
This is her new bedspread and head board

We turned the home office into Maire's bedroom so it is a bit small.
But she loves it and has already made it her own (obviously)  haha

the precious finials on Maire's curtain rod

Master bedroom
My mom chose soft green for the bedroom and a bit darker green for the bath.
I think the bedroom turned out really well

Master bath


Daddy's study/sunroom

It is a bit messy, but this is the wetbar area in the sunroom


This is the great room
(the only room we didn't paint ourselves)

the kitchen
the only room we didn't paint at all

the incredible pantry!!

and last but not least, the laundry room
the picture doesn't do it justice becasuse it is a pretty nice size.

Well, I am officially back in Auburn for another semester.  I am soo happy to be back, but also want to be home when my family makes the final move into the new house.  But, I am blessed to have been able to spend my summer at home with my family. It was a great one!